Properly formatting citations and references has always driven researchers crazy. With Microsoft Office Word, though, the process is streamlined to the point of almost being automatic. Microsoft Word automatically generates a bibliography from the sources you used to write your manuscript. Each time you add a new citation to your document, This handout is going to show you how to add citations and bibliographies to your Word documents and how to format references automatically using the Microsoft Word References tool.
How to Automatically Add Citations and Bibliographies to Your Document
Properly formatting citations and references have always driven researchers crazy. With Microsoft Office Word, though, the process is streamlined to the point of almost being automatic. Microsoft Word automatically generates a bibliography from the sources you used to write your manuscript. Each time you add a new citation to your document, Word adds that source so that it appears in the bibliography in the proper format, such as APA, Chicago/Turabian, and MLA style. This handout is going to show you how to add citations and bibliographies to your Word documents and how to format references automatically using the Microsoft Word References tool.
The techniques this guide is going to discuss here should work for all Microsoft Word newer versions. The screenshots are all taken in the latest version of Microsoft Word 2020 for Mac, so your Word version might look slightly different, but it works the same way.
Before you can add a citation, a works cited list, or a bibliography; you should add a source to your word document. A works cited list is a list of references, usually placed at the end of the main text, that you referred to in your document. A works cited list is different from a bibliography, which is a list of sources that you consulted when you created the document.
When you add a new source, the source information is saved on your computer automatically
When you complete adding your sources, you can automatically generate a works cited list or a bibliography based on your source information that you completed already. When you add a new source, the source information is saved on your computer automatically. If you want to find and reuse any source that you have previously created, even sources in your other documents, you can use the Citations tool.
A citation is a parenthetical reference that is placed in line with the text. A citation is different from a footnote or an endnote, which is placed at the bottom of the page or end of the document. You can use the source information stored in your citation tool to create citations, a reference list, or a bibliography. However, there is no way to create footnotes or endnotes by using the information in Citations tool or the Source Manager.
For more information about citation styles for various manuals, such as APA, MLA, or Chicago Style, read the following articles: Citation Styles | Which Citation Style Should I Use?, APA Formatting Guide for Academic Manuscripts.
Step 1:
Open a new or existing Microsoft Word document.
Step 2:
Place your cursor where you would like your in-text reference to be.
When you are working on any Word document, place your cursor where you want the citation to be placed.
Step 3:
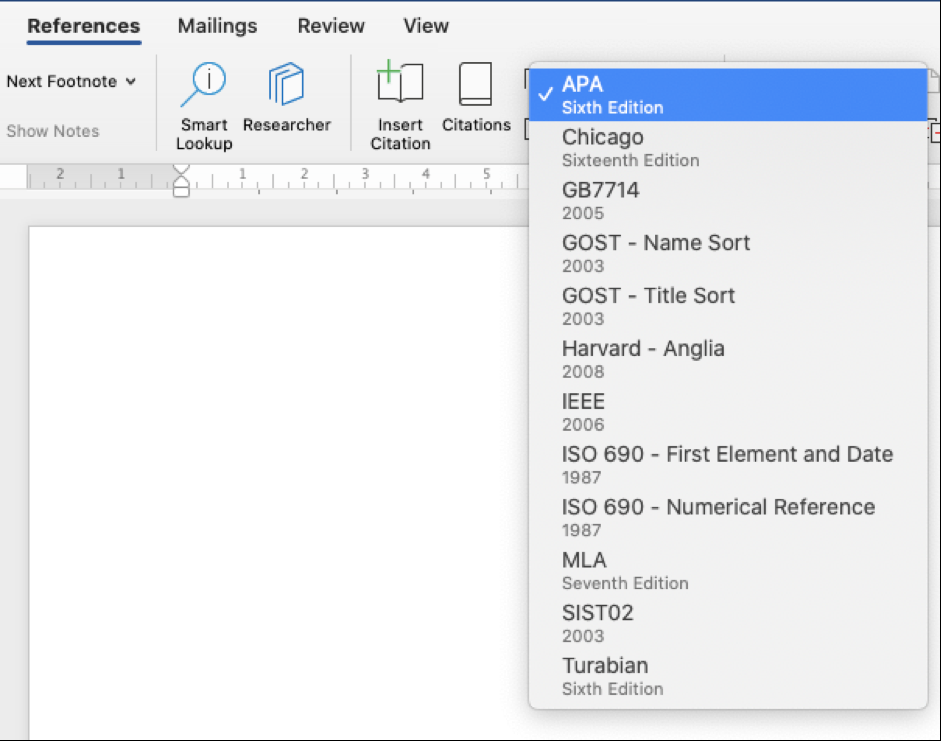
Choose a documentation style (APA, Chicago, MLA, or IEEE) from the dropdown menu.
Step 4:
Click at the end of the sentence or phrase that you want to cite.
Choose the References tab at the top and click the Insert Citation button.
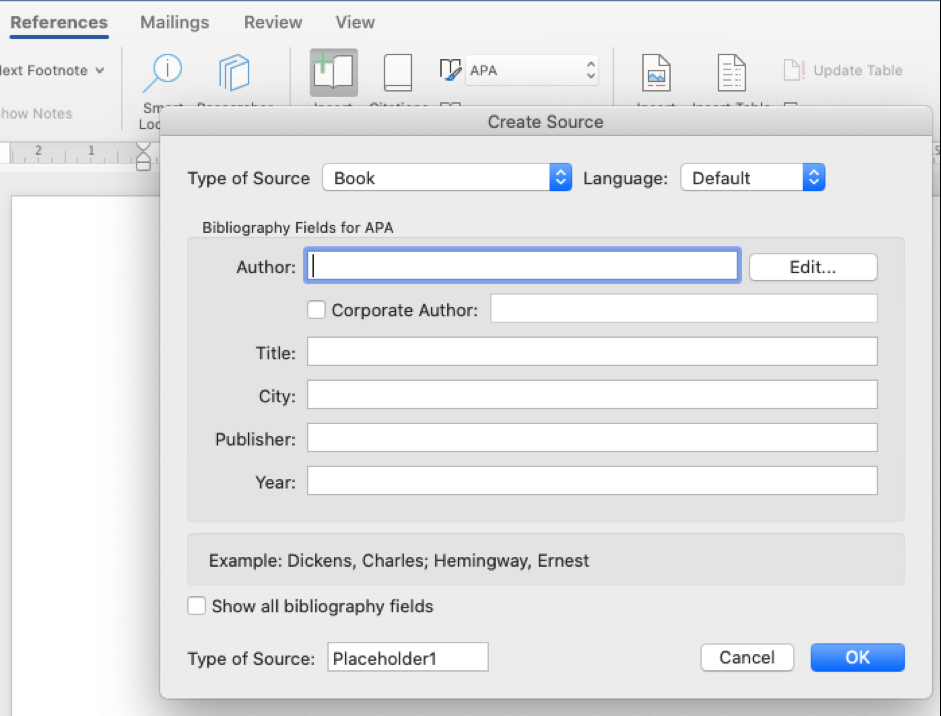
In the Create Source dialog box, next to Type of Source, select the type of source you want to us.
In this dialog box, you can enter all of the relevant information for your source. The default setting for the Type of Source dropdown is Book.
If you want to enter other types of sources such as a book section, an article in a journal or periodical, or a website, open the dropdown menu to choose the type of source you want.
Then click OK to complete the source.
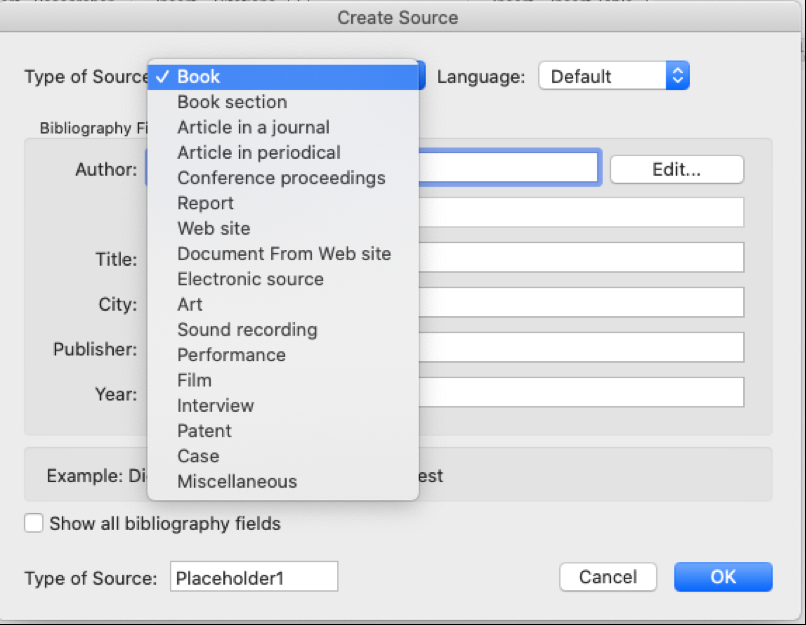
Enter the details for your source (for example, author name, title of the source, and year of the publication), and click OK. The source is added as a citation at the place you selected in your document. If you want to add more details for your source, check the Show all bibliography fields box.
When you have completed the steps mentioned above, the citation is added to the available citations. The next time you quote this reference, you do not have to type it all out again. Just select your source from the list of available citations.
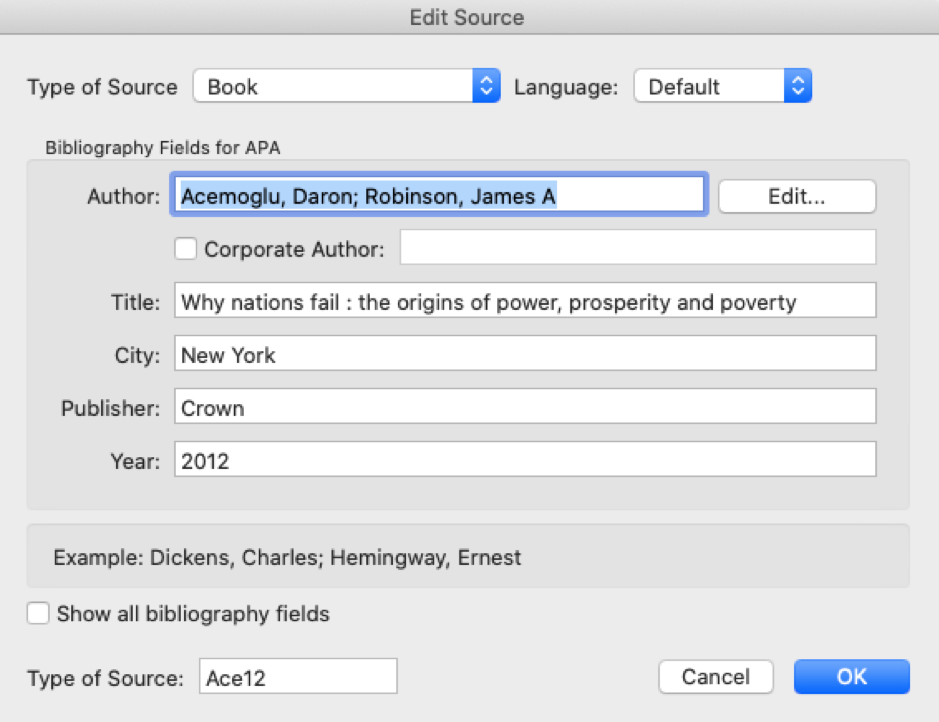
Here is an example:
You can repeat those steps to add any other sources you need, and to place citations where you want.
Step 1:
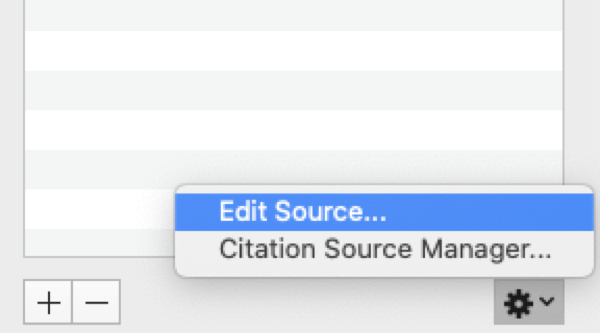
If you want to edit a source, go to the References tab, click Citations, and then click the settings button in the bottom right corner of the Citations pane.
Step 2
Click Edit Source, make the necessary changes to the source and then click OK.
Step 3
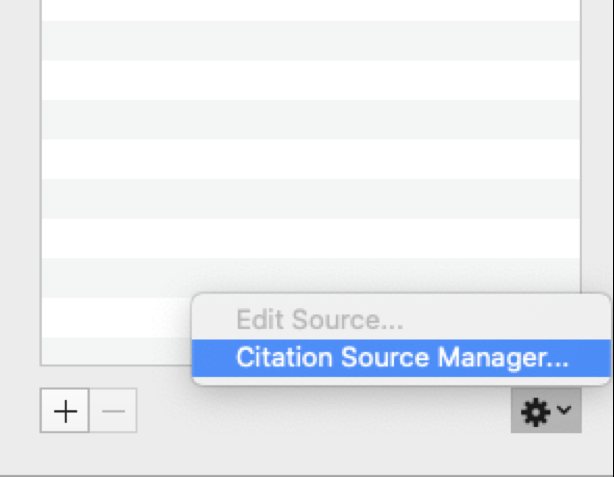
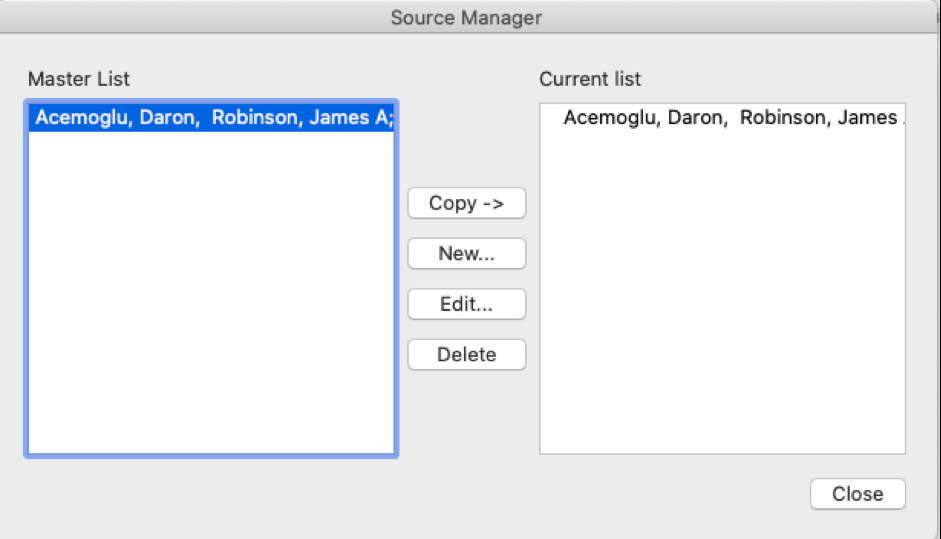
If you want to manage your list of sources, click Citation Source Manager and then add, edit, or delete sources in your list. You can also copy the available sources or add a new one.
Follow the steps below to add a citation to your document.
Step 1
Place your cursor where you would like your in-text reference to be and then on the References tab, click Citations

Go to the Citations pane on the right and double-click the citation you want to add to your document.
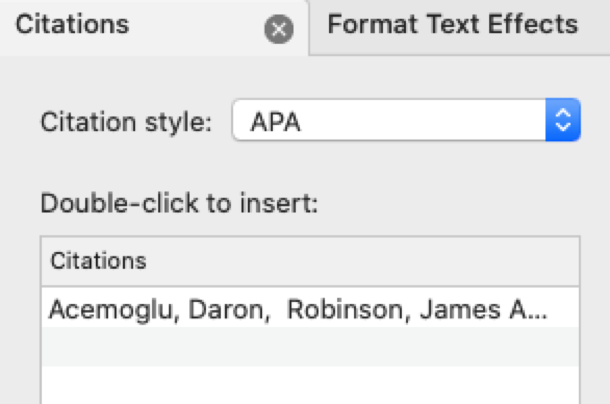
A reference list or bibliography is a list of all works you cited or referred to in your document. When your document is completed, you will want to add a bibliography or works cited list that lists all your sources.
Step 1:
Click where you want the Works Cited or Bibliography to appear (mostly at the very end of the main text).
Step 2:
On the References tab, click the arrow next to Bibliography, and then click Bibliography or Works Cited.
A works cited list is typically used when you cite sources using the Modern Language Association (MLA) style, and it differs from a bibliography, which is a list of all works that you consulted when your researched and wrote your document.
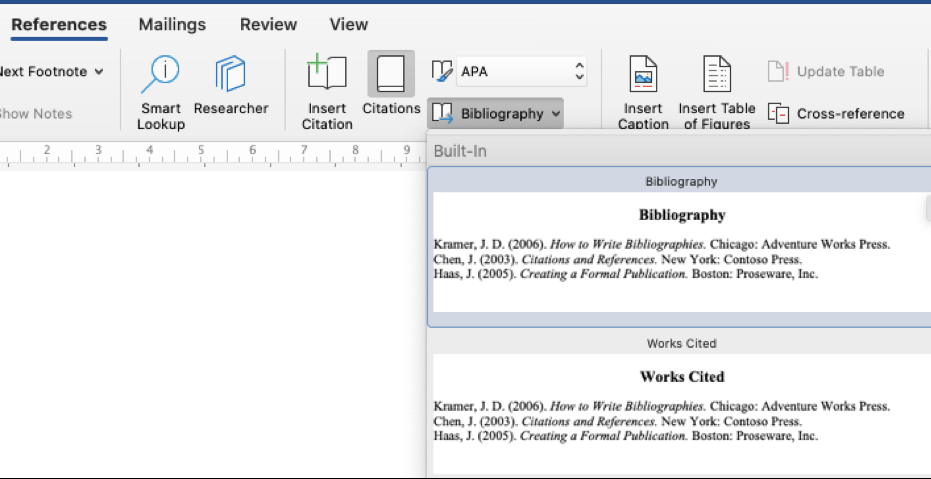
When you click Bibliography, you will have the following list (for APA style):

When you click Works Cited, you will have the following one (for MLA style:

You can change the style of all the citations contained in your document's works cited list or bibliography without manually editing the style of each citation. You can change the citations from the APA style to the MLA style based on your manual.
Go to the View menu, click Draft or Print Layout.

On the References tab, click Citations.

In the Citations pane, on the Citation style list, select a style.
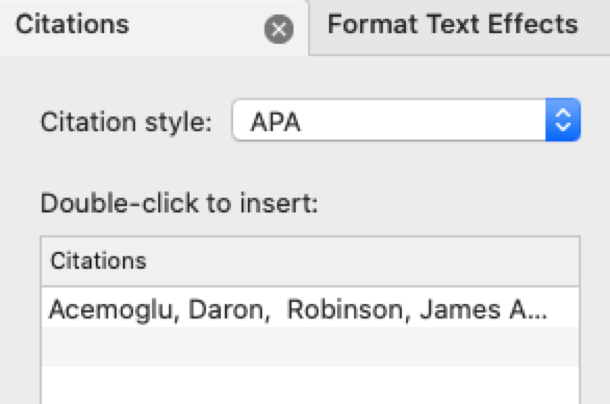
All references in your document's bibliography or works cited list change to the new style.
Best Edit & Proof expert editors aim to provide your manuscripts with proper scholarly and academic tone and style. They will significantly improve the chances of having your research manuscript accepted for publishing. They provide subject-area proofreading and editing services in several fields categorized under various disciplines. With our extensive knowledge and expertise, we will help you find the right tone and style for your manuscript.
If you need our subject-area editors to format your manuscripts, giving you the fundamental rules for formatting your manuscripts as described in your guidelines, such as APA, MLA, or Chicago/Turabian styles, then contact us. At Best Edit & Proof, our proofreaders and editors edit every type of academic paper. We have a user-friendly website, and a simplified ordering process.
If you would like our subject-area editors and language experts to work on your project for the improvement of its academic tone and style, then please visit the order page. It is easy! It takes only a few minutes to submit your paper and complete the process. Click here to see how it works.
We have flat-rate pricing based on our type of service (editing or proofreading), word count, and turnaround time. Enter your word count or copy and paste your document into our pricing calculator to get an instant quote.
If you need support for editing and proofreading services, contact us. You can also e-mail us or use the 24/7 live chat module to get direct support. We have a 24/7 active live chat mode to offer you direct support along with qualified editors to refine and furbish your manuscript. Alternatively, you can text us through our WhatsApp business line.
Follow us on Twitter, LinkedIn, Facebook, Instagram, and Medium.
For more posts, click here.
For more information about the citation styles and APA style, read the following articles:
The 9 Most Important Changes in the 7th Edition of the APA Manual
How to Present Tables and Figures in APA Style (7th edition)
How to Cite Sources in APA Referencing Style? | With APA 7th Edition Update
This handout discusses how to add citations and bibliography automatically to your manuscript. To give you an opportunity to practice your proofreading, we have left a few spelling, punctuation, and grammatical errors in the text. See if you can spot them! If you spot the errors correctly, you will be entitled to a 10% discount.
How to Cite Sources in APA Referencing Style | With APA 7th Edition Update
30.11.2020
Importance of Citations in Academic Writing
05.03.2022
How to Use Track-Changes Feature in Microsoft Word 2021
19.11.2020
How to Use ‘‘et al.’’ in APA Style (7th Edition)
28.11.2020
A Complete Guide to MLA In-Text Citations
01.06.2021
MLA Paper Format: How to Format a Paper in MLA Style
31.05.2021
How to Format DOI in APA Style (APA 7th Edition Update)
29.11.2020

Track-Changes function of Microsoft Word tool is a very handy tool to include a printed version of a document in. In this short handout created by our tech team, we will show you how to print track changes in a Microsoft Word document.
Continue Reading
If you are just beginning to write a thesis, a dissertation, or an article for a peer-review journal, you will fumble upon countless new writing styles, fonts, formats, and citation styles. Academic writing differs from other forms of writing as it often follows a set of structures, involves the use of formal language, grammar, and words. This article aims to clarify everything concerning citation and citation styles so that you can select which one to opt for while writing your thesis, dissertation, or research paper.
Continue Reading
The American Psychological Association (APA) format is the most common style used to cite sources within the social sciences. This handout will give you a brief guide on the Publication Manual of the APA. For more information, please consult the Publication Manual of the American Psychological Association (7th Edition).
Continue Reading
The acronym ‘‘et al.’’ is an abbreviation for the Latin term ‘et alia,’’ meaning ‘‘and others’’ and used in academic in-text citations when referring to a source with multiple authors. Depending on the number of authors a reference has, an APA in-text citation is abbreviated by using ‘et al.’ after the first author’s last name.
Continue Reading
The American Psychological Association (APA) introduced the 7th edition of the APA Publication Manual in 2019 and replaced the previous one, the 6th edition. Since then, several things have changed. The 7th APA edition updated citing ebooks as well.
Continue Reading
The term ‘‘et al.’’ is the abbreviated form of the Latin term ‘‘et alia,’’ which means ‘‘and others.’’ It is used in academic in-text citations when referring to a source with multiple authors. In APA style, for a source with three or more authors, list the first author’s last name and “et al.” for all citations, including the first citation.
Continue Reading
Track changes function in Microsoft Word 2021 for macOS is a very handy tool to track your revisions, corrections, changes, edits, and even suggestions and comments while you’re reviewing a document. When an editor or proofreader wants to return a revised document to a client with his/her all revisions visibly marked, and so clients can accept or reject, or the suggested changes appear in the margins of the returned document, he/she needs Track Changes function of Microsoft Word.
Continue Reading